
 Archisoft's new AMI (Amazon Machine Image) offers a turnkey (one-click) web server solution pre-configured and ready to deploy for DIY, small and medium size businesses. It is simple to deploy, yet configurable and scalable.

This is a custom compiled web server with the latest open source technologies on a proven and stable enterprise class operating system (CentOS v7.5) with long term support, which is best suited for production environments. This AMI is a true one click solution. Once activated, follow the step by step instructions to setup your domain name, ftp, email user accounts with encryption, SPF, DMARC & DKIM support for both host.your-main-domain.tld as well as all your hosted domains. Every email originating from your server will be properly authenticated and signed to avoid spam classification.
This AMI is WordPress ready. WordPress, PhpMyAdmin, RoundCube email app. and many other scripts can be installed from the control panel "Install Scripts" section. Webmin Pro users will see greater variety of scripts available.

This AMI saves hundreds of hours of compilation and testing of various technologies. By default CentOS v7.5 + Webmin/Virtualmin control panel comes with much older versions of MariaDB (v5.x series) & Apache. This AMI is compiled with the latest version of NGINX & MariaDB. Yum update will keep these packages updated. Performance & stability can drastically vary, even if they are running the same technologies. However, when compiled based on benchmarking and compatibility testing, it produces a much higher level of server performance and stability. Test it and you'll know that this AMI is production ready in all aspects.

Stay assured that this AMI was developed to host our own projects and for managed customers. We have made this AMI available for public use via AWS marketplace for a minimal fee, starting at only $0.002/hr or $1.45/mth or $11/yr. Like AWS reserved EC2 discount plans, annual AMI subscribers will receive up to 40% AMI discount to further reduce server cost.
Note: Detailed step by step instructions are provided to help DIY community.
WHM/cPanel Users: Webmin/Virtualmin/Usermin control panel is as or more powerful platform. Webmin/Virtualmin has lots to offer, it is a stable platform, it will not bloat or break your server with automated updates & features. Additionally, you can use this open source control panel for free as long as you want. If at anytime support is required, just upgrade to pro version for added features and support (plans start at $5/mth).
Important: Webmin/Virtualmin control panel might look and work differently compared to WHM/cPanel. These two control panels take different approaches, for example Webmin/Virtualmin takes a unix like approach, which might take some time to get comfortable.
Our team has prepared step by step instructions to help with the transition and to get you started quickly!
1) Launch an instance using Perfect7 v2 LEMP CentOS Apache MariaDB MultiPHP Webmin CSF AMI from the above link or search for "Perfect7 v2 LEMP CentOS" from "Launch Instance" >> "AWS Marketplace" tab on the left.
2) AWS Security Group Settings as follows:
	Type: HTTP  | Protocol: TCP | Port Range:  80 | Source: Anywhere (0.0.0.0/0)

	Type: HTTPS | Protocol: TCP | Port Range: 443 | Source: Anywhere (0.0.0.0/0)

	Type: SMTP  | Protocol: TCP | Port Range:  25 | Source: Anywhere (0.0.0.0/0) >> (to send & receive emails)

	Type: All traffic | Protocol: All | Port Range: 0 - 65535 | Source: your ip
3) SSH Keys: Create or use a saved SSH Keys: Your login will be like this:
ssh -i "/path/to/your/SSH-Key.pem" centos@YourInstanceStaticIPAWS Cloud instances are provided with non static (ephemeral) IP address, which changes without notice. However, a web server requires a static IP address to map your domain name to your server.
After launching your AMI, click on "Elastic IPs" from the left menu under NETWORK & SECURITY. Then click on "Allocate New Address" button. Once allocated, select the IP and click on "Actions" button to select "Associate Address" and select the instance that you just launched using Perfect7 AMI and allocate IP address.
Note this IP address for steps below.
By default AWS restricts outgoing email from newly obtained IP's. For production, it is important to have these limitations removed. Click here to fill out the form to have this limitations removed by AWS. In Reverse DNS Record, enter your primary domain name like this: www.yourdomain.tld or yourdomain.tld (whichever way you intend to use your domain).
Note: Only after this limitation is removed (you will receive an email confirmation), you can test outgoing emails from your web server as described in the steps below.
For this step by step instructions we assume that
- the hostname for your web server will be: host.yourmaindomain.tld
- nameservers to be ns1.yourmaindomain.tld & ns2.yourmaindomain.tld
- that you have set the nameservers to the above from your domain control panel DNS settings
Note: it can take few hours for your domain registrar to apply nameserver settings.
For this step by step instructions we assume that this is a fresh configuration. However, if you are migrating from another Webmin/Virtualmin installation, then you can skip most of the steps below. You can create a Webmin backup and restore it from Webmin tab > Webmin > Backup Configuration Files. You can backup and restore sites from Virtualmin tab > Backup and Restore section. Before restoring Webmin or Virtualmin, make sure to run Post Installation Wizard and update MySQL password as described below.
Using a SSH client like Terminal / Putty login using a command like this:
ssh -i "/path/to/your/SSH-Key.pem" centos@YourInstanceStaticIP
Once connected to your instance, run the following commands.
Webmin/Virtualmin Control Panel uses your root login credentials. The username is root, to create a password, use the following command.
$ sudo passwd root
New password:
Run the following command to manually update your server software. Note: Webmin/Virtualmin can automatically update security patches for you. You can set it from Webmin/Virtualmin control panel from Webmin Tab > System > Software Package Updates > "Scheduled checking options".
$ sudo yum -y updateYou can obtain your public IP from https://ipinfo.io. Once you have your IP address, run this command to whitelist it. Once you login to the Webmin control panel CSF can be managed from Webmin tab > System > ConfigServer Security & Firewall.
$ sudo csf -a yourCurrentIPaddress# Note: Services can also be restarted from the main Webmin Control Panel screen under "Servers Status" tab.
# ConfigServer Security & Firewall (CSF) can be managed from Webmin tab > System > ConfigServer Security & Firewall
# to deny a IP from accessing your server use -d option
$ sudo csf -d IPtoBlock
# to edit CSF allow file
$ sudo nano /etc/csf/csf.allow
# to edit CSF deny file
$ sudo nano /etc/csf/csf.deny
# restart CSF
$ sudo csf -r
# restart Webmin / Virtualmin Control Panel
$ sudo service webmin restart
# restart Apache Webserver
$ sudo systemctl restart httpd
# restart FTP server
$ sudo systemctl restart proftpd
# restart MySQL Database
$ sudo systemctl restart mariadb.service
# restart DNS server
$ sudo systemctl restart named.service
# restart your Instance
$ sudo reboot now

https://YourInstanceStaticIP:10000Username: root
Password: the password that you entered above
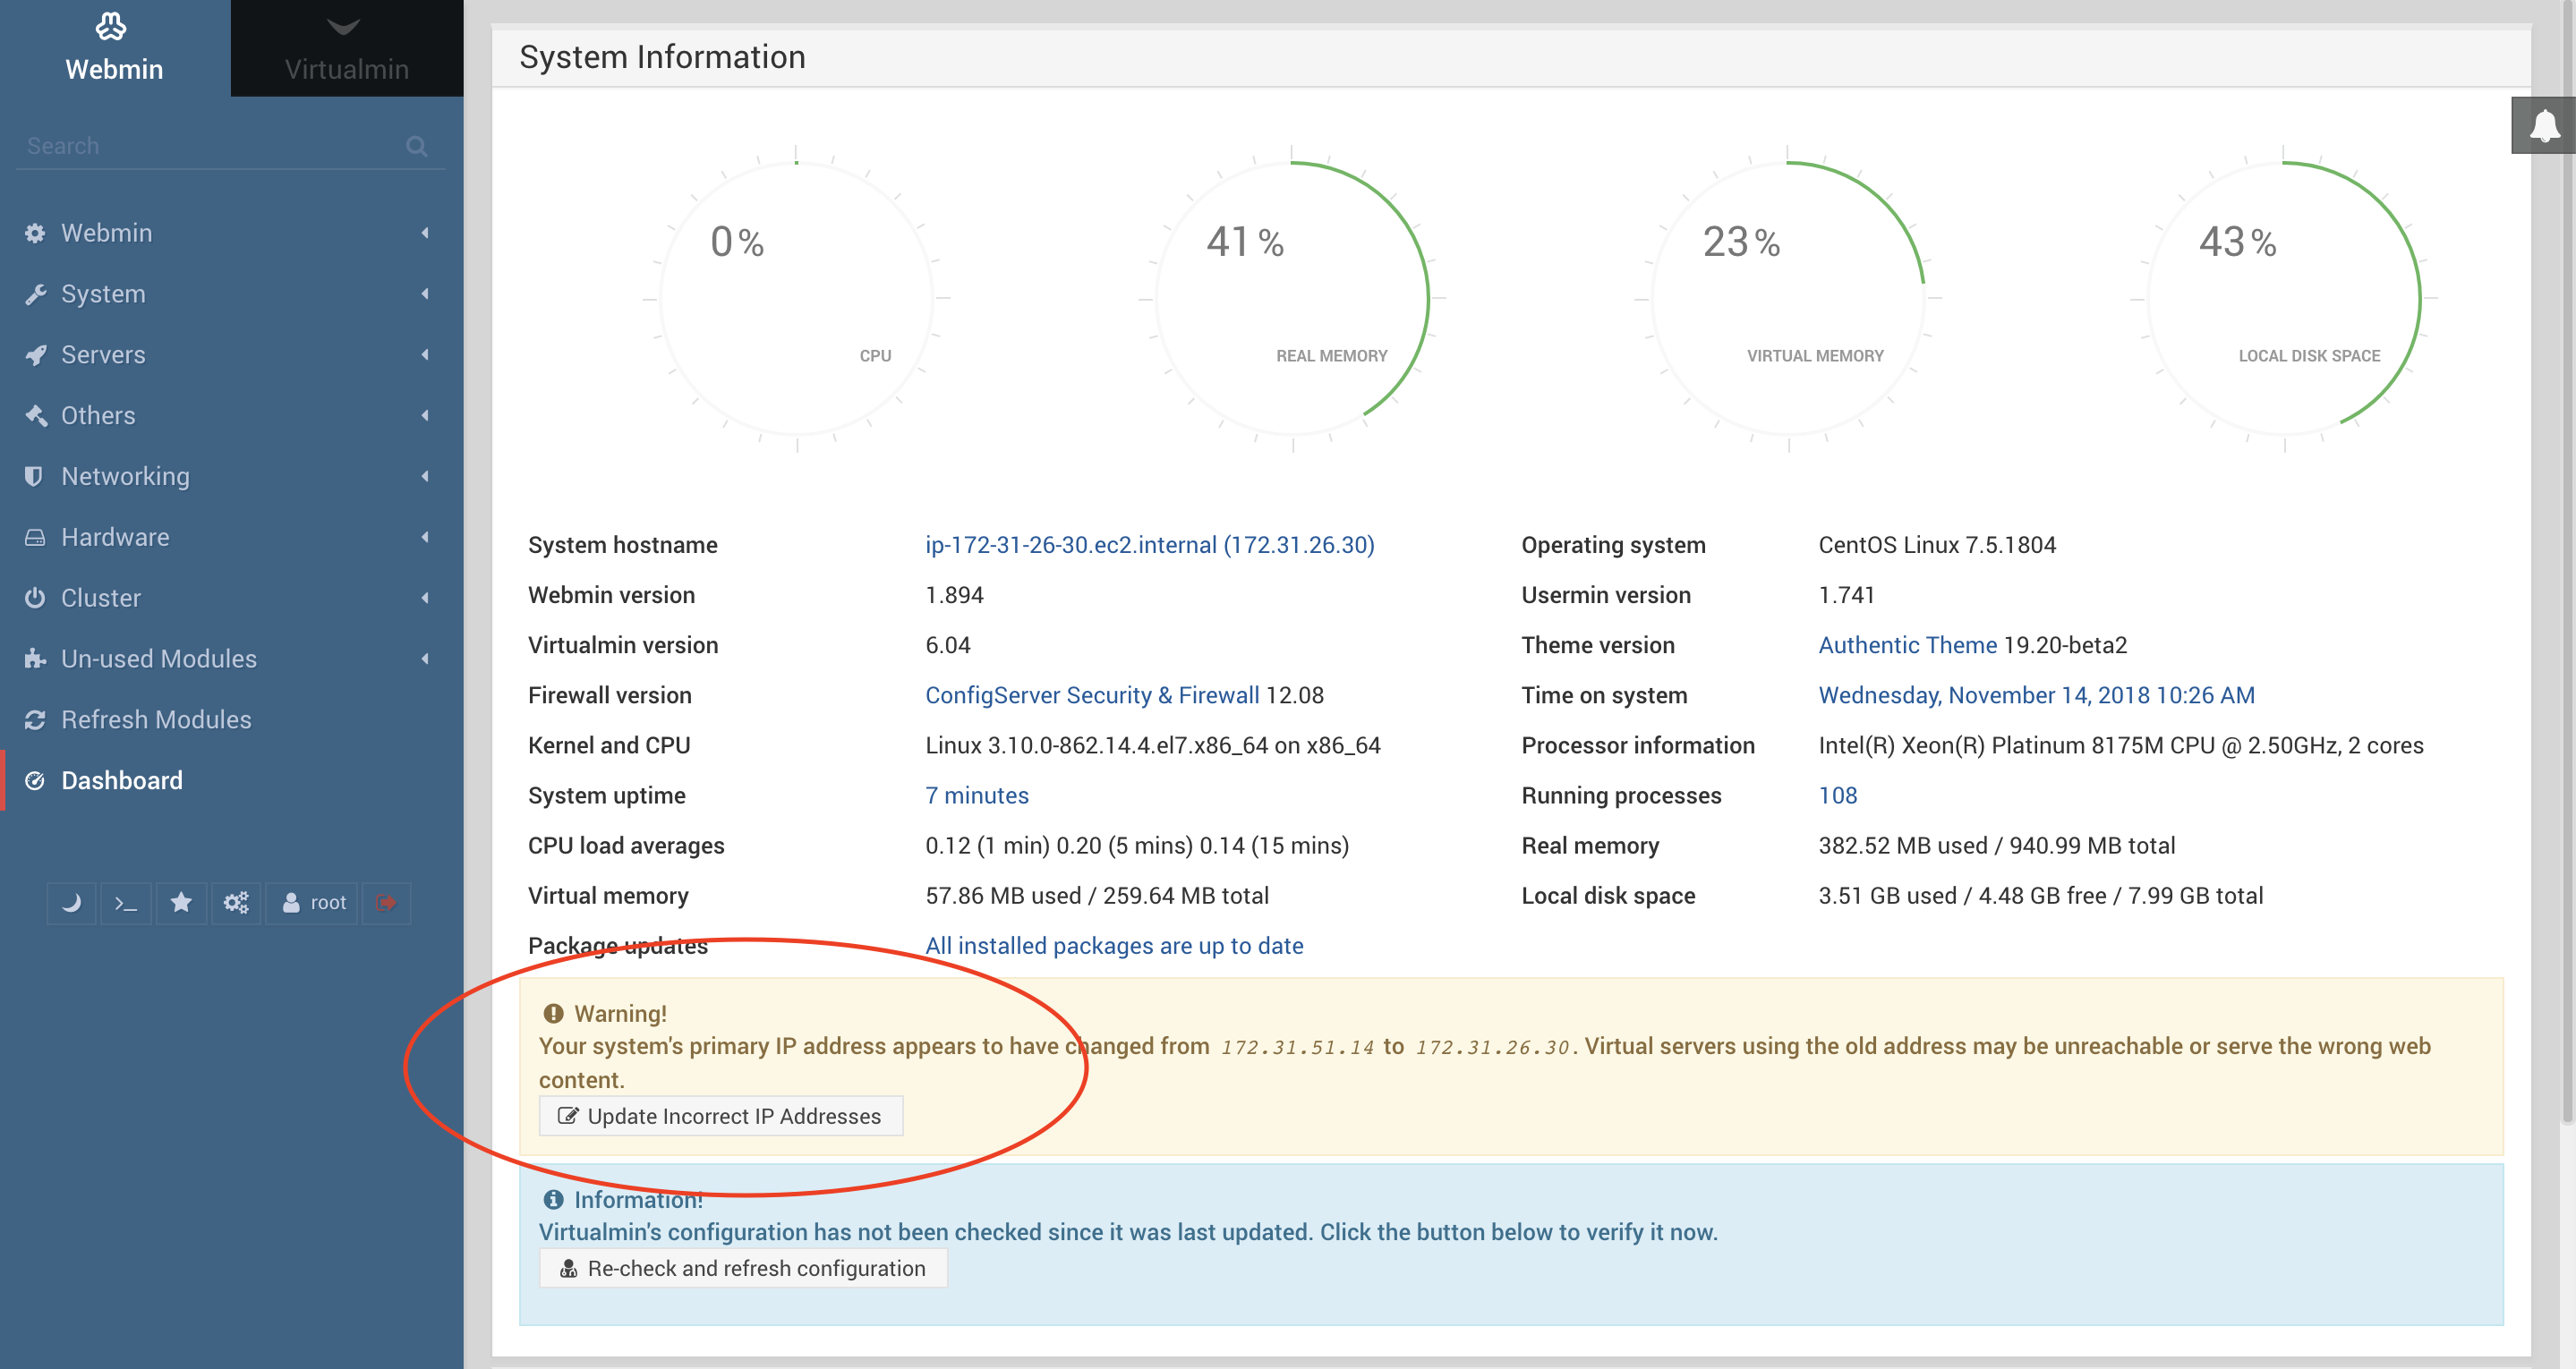
Click on Webmin tab (top left corner) > from the main System Information page, Click on "Update Incorrect IP address" and then click on Change Now button (accept default values - nothing to edit)
If you do not see "Update Incorrect IP address" option, click on Virtualmin tab > System Settings > Virtualmin Configuration > Network Settings tab and set "Network interface for virtual addresses" to "Detect automatically" and click on Save button. After this update click on Webmin tab and you will see the "Update Incorrect IP address" option.

Click on Virtualmin Tab > System Settings > Re-Run Install Wizard. This will walk you through the basic options. You can come back to this and change any of these options at anytime.
***NOTE: During this setup, Enable MySQL by setting "Run MySQL database server?" to "Yes" BUT in the next step leave MySQL password field blank (clear that field). You can set MySQL password in the steps below (if you enter a password in this step it'll exit out of the post installation wizard)
In "Primary nameserver" field enter ns1.yourdomain.tld. In Secondary nameservers enter: ns2.yourdomain.tld >> make sure to check: Skip check for resolvability
After Post-Installation Wizard completes click on Re-Check Configuration. Then from the control panel Reboot the instance, you will see that option after re-checking completes
Note: During this process, if the server will stop responding, reboot it via ssh command like: sudo reboot now
Virtualmin Tab > System Settings > MySQL Server > right of Local server > click on Manage button & then click on Change Administration Password button to create your primary MySQL Password.
Webmin tab > Networking > Network Configuration > click on Hostname and DNS Client button
Enter your "Hostname": host.yourdomain.tld
Update "Search domains" field with your domain: yourdomain.tld (select "Listed" option)
>> click on Save button. On the next screen >> Click on Apply Configuration
Webmin tab > Servers > BIND DNS Server > click on Zone Defaults button
Edit Template records:
Set Record name & Type like: ns1.yourdomain.tld > Name Server
Next Field: ns2.yourdomain.tld > Name Server
Click on Save button
Virtualmin Tab > Email Settings > DomainKeys Identified Mail
Signing of outgoing mail enabled? Yes
Reject incoming email with invalid DKIM signature? Yes
Additional domains to sign for:
yourdomain.tld
host.yourdomain.tld
Click on Save
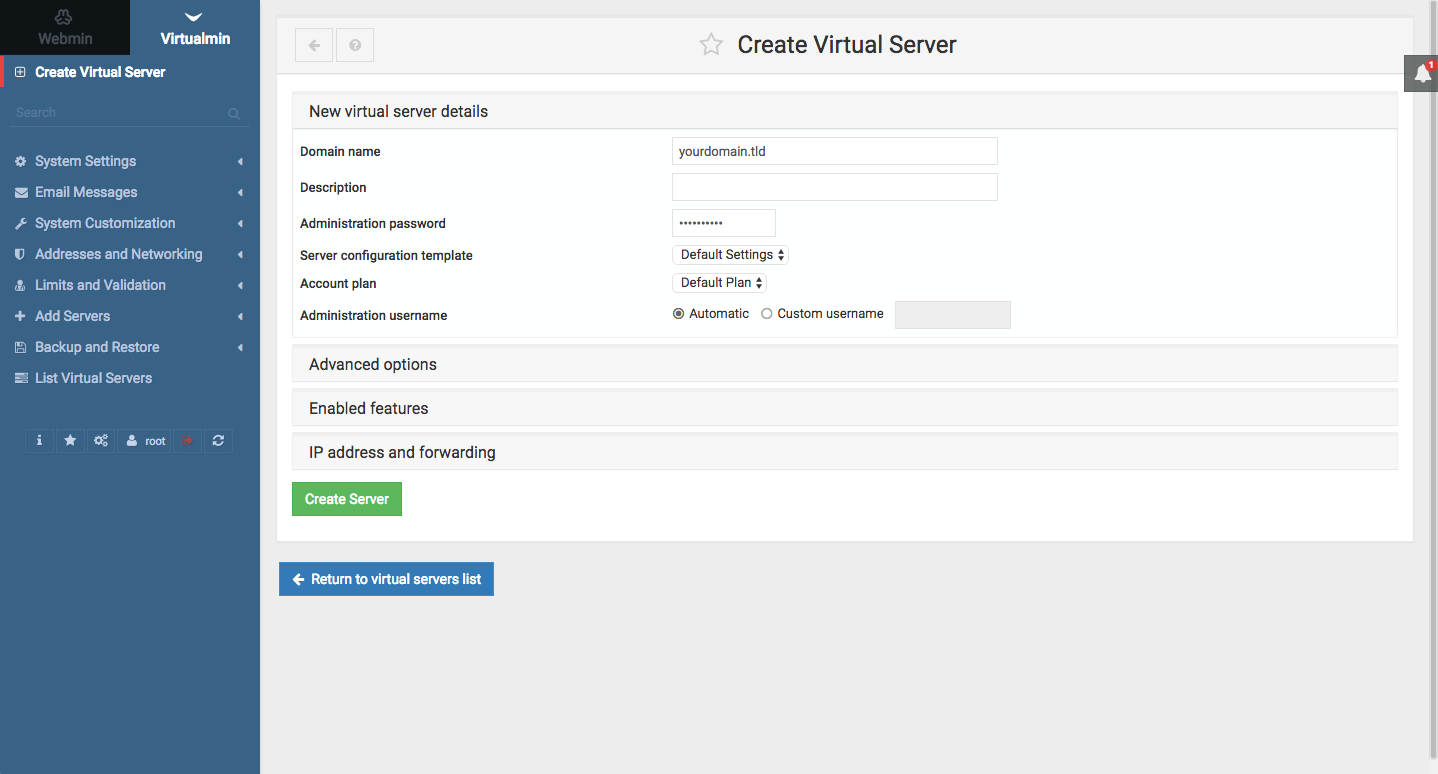
Now you can add the first domain to your server (this is your main domain that you used for host, ns1 & ns2).
From Virtualmin tab click on "Create Virtual Server" (Virtualmin Tab > Create Virtual Server) and enter your domain name and a password.
Click on "Enable Features" tab and select "Setup SSL website too?"
Click on "Create Server" button.
Virtualmin Tab > yourdomain.tld > Server Configuration > DNS Options
Set "Allowed sender hostnames" to the following:
yourdomain.tld
host.yourdomain.tld
Set "Action for other senders" to: Disallow
Set "DMARC record enabled?": Yes
Set "DMARC policy for emails that fail SPF or DKIM": Reject Email
Click on Save
Virtualmin Tab > yourdomain.tld > Server Configuration > DNS Records
Click on "Manually Edit Records" button
Make a duplicate copy by copying and pasting your site's _domainkey & _dmarc sections and modify it by adding "host." next to yourdomain.tld like this example:
default._domainkey.host.yourdomain.tld.	IN	TXT	( "v=DKIM1; k=rsa; t=s; p=MIIBIjANBgkqhkiG9w0BAQEF55555Q8AMIIBCgKCAQEAuGPOLZe7SI+cj"
	"e+ngbkWk1opPGUzyw1H85oFYc6L7ClKuaopfn5OLJ6+9FIiz6nx6u53yjaU4avPNXojoHSs5"
	"HKPTvl/xaGVd4dekmAhsGVP0x1mf8MqxoSuVmuonzu2gl1lTVC9ZKcdK9LTMKjQ5wuO0cDnm"
	"T/5CKWrAljDx8SvM+hMYj1yrlDPcn4+Z8oo3fcHZv1Qc4TdhYlRHrE8BO7DJVDJCGwUFq/+w"
	"McMNiwm+nTkKAmvXd/JruDdId/vQvcb0lll3tU1o83+XrKo1RlATiYehebJWGpEcy5hIiVG3"
	"hrcDSO/5wIDAQAB" )
_dmarc.host.yourdomain.tld.	IN	TXT	"v=DMARC1; pct=100; ruf=mailto:postmaster@yourdomain.tld; rua=mailto:postmaster@yourdomain.tld; p=reject"
Click on "Save and Close" button
Virtualmin Tab > yourdomain.tld > Server Configuration > DNS Records
Check on host and click delete record button to delete it.
Now Create new CNAME record for host by clicking on the pull down menu next to the green button and select "CNAME - Name Alias" option & then click on the green button "Create Record of Type". On the next page set "Record name" to host and "Target DNS name" to yourdomain.tld and click on Create button.
You should now see host record updated with a CNAME record.
Virtualmin Tab > yourdomain.tld > Server Configuration > Manage SSL Certificates Click on "Let's Encrypt" tab and Request Certificates. Once the certificates are obtained add certificates to ProFTP and other services from that interface.
Webmin tab > Servers > Nginx Webserver > Edit Configuration Files
	# Each domain that you create, will have a "server { ... }" block
	# Edit this to change domain settings

	# Look for this line (ip will be different)
	listen 172.12.34.56;

	#replace it with
	listen 80;


	# add these lines below listen 80;, if they are not present
	ssl_protocols TLSv1 TLSv1.1 TLSv1.2;
	ssl_prefer_server_ciphers on;
	ssl_ciphers ECDHE-RSA-AES128-GCM-SHA256:ECDHE-ECDSA-AES128-GCM-SHA256:ECDHE-RSA-AES256-GCM-SHA384:ECDHE-ECDSA-AES256-GCM-SHA384:DHE-RSA-AES128-GCM-SHA256:DHE-DSS-AES128-GCM-SHA256:kEDH+AESGCM:ECDHE-RSA-AES128-SHA256:ECDHE-ECDSA-AES128-SHA256:ECDHE-RSA-AES128-SHA:ECDHE-ECDSA-AES128-SHA:ECDHE-RSA-AES256-SHA384:ECDHE-ECDSA-AES256-SHA384:ECDHE-RSA-AES256-SHA:ECDHE-ECDSA-AES256-SHA:DHE-RSA-AES128-SHA256:DHE-RSA-AES128-SHA:DHE-DSS-AES128-SHA256:DHE-RSA-AES256-SHA256:DHE-DSS-AES256-SHA:DHE-RSA-AES256-SHA:AES128-GCM-SHA256:AES256-GCM-SHA384:AES128-SHA256:AES256-SHA256:AES128-SHA:AES256-SHA:AES:CAMELLIA:DES-CBC3-SHA:!aNULL:!eNULL:!EXPORT:!DES:!RC4:!MD5:!PSK:!aECDH:!EDH-DSS-DES-CBC3-SHA:!EDH-RSA-DES-CBC3-SHA:!KRB5-DES-CBC3-SHA;
	ssl_session_timeout 1d;
	ssl_session_cache shared:SSL:50m;
	ssl_stapling on;
	ssl_stapling_verify on;
	add_header Strict-Transport-Security max-age=15768000;


	# locate this line (ip will be different)
	listen 172.12.34.56:443 default ssl;

	# replace it with this line
	listen 443 ssl http2;
*Note: Strict-Transport-Security will force all http urls to be converted to https. If you will be serving non https content, you can disable this feature from the Nginx Config File.
	# comment it or remove it to disable this feature
add_header Strict-Transport-Security max-age=15768000;Your primary site's username and password can be used to FTP files to your server. This user has access to the site's root directory. If you want to upload files to /public_html, then add this to your FTP client. Also FTP username for the primary user is just username without the @yourdomain.tld
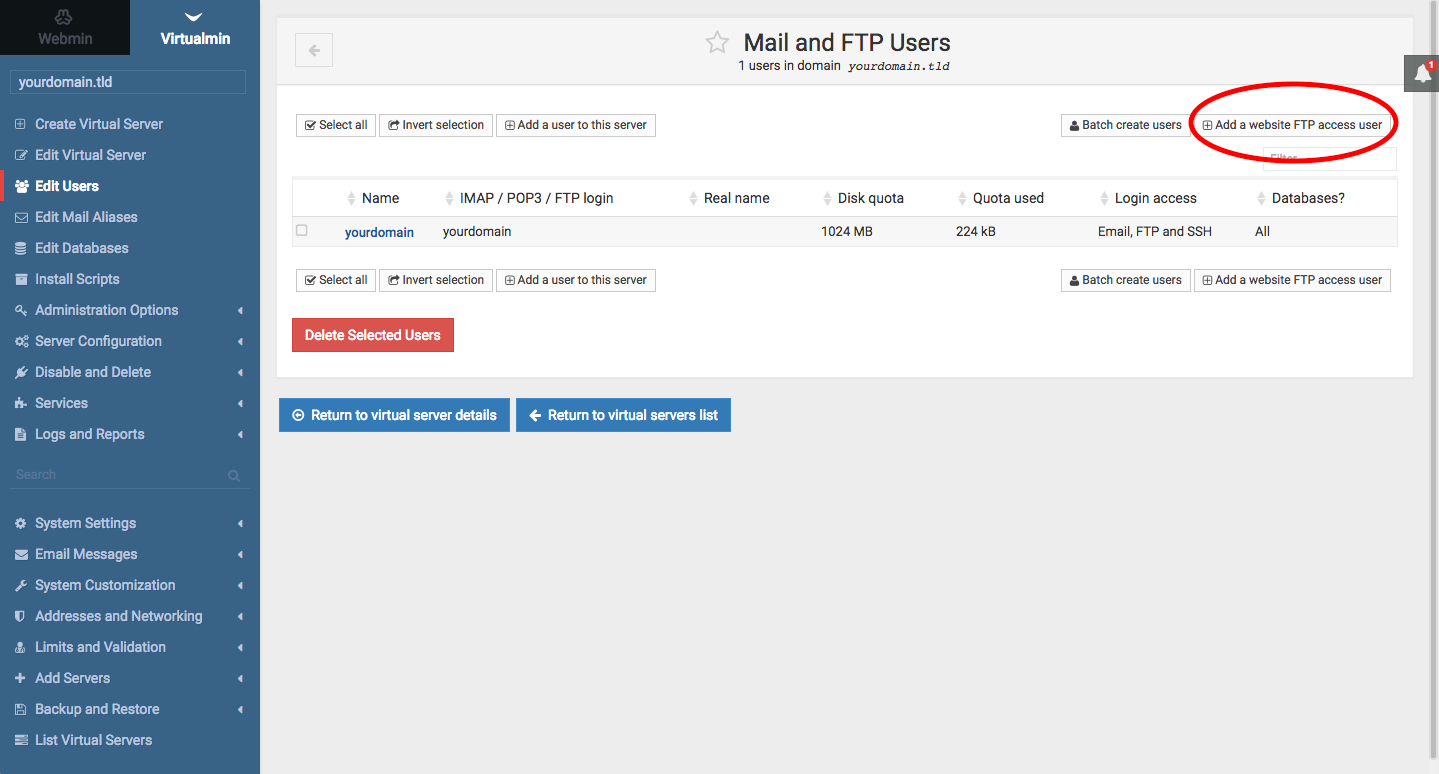
Alternatively, you can create additional FTP only account's which by default is configured to /public_html as the root directory. You can also change the directory to /public_html/userdir. To create a FTP only user, go to Virtualmin Tab > yourdomain.tld > Edit Users > click on "Add a website FTP access user" button (top right). On the next screen create user. The FTP login username will be newuser@yourdomain.tld, always use "FTP with TLS/SSL" option, port is 21, server name is yourdomain.tld.
Go to Virtualmin Tab > yourdomain.tld > Edit Users > click on "Add a user to this server" button located towards the top left. Creating a user account from this page provides with email access for that user. You can also choose to grant FTP access. This FTP is not website root access, but acts as a storage container where the user can store files. You can also manage the user's MySQL access from this screen.
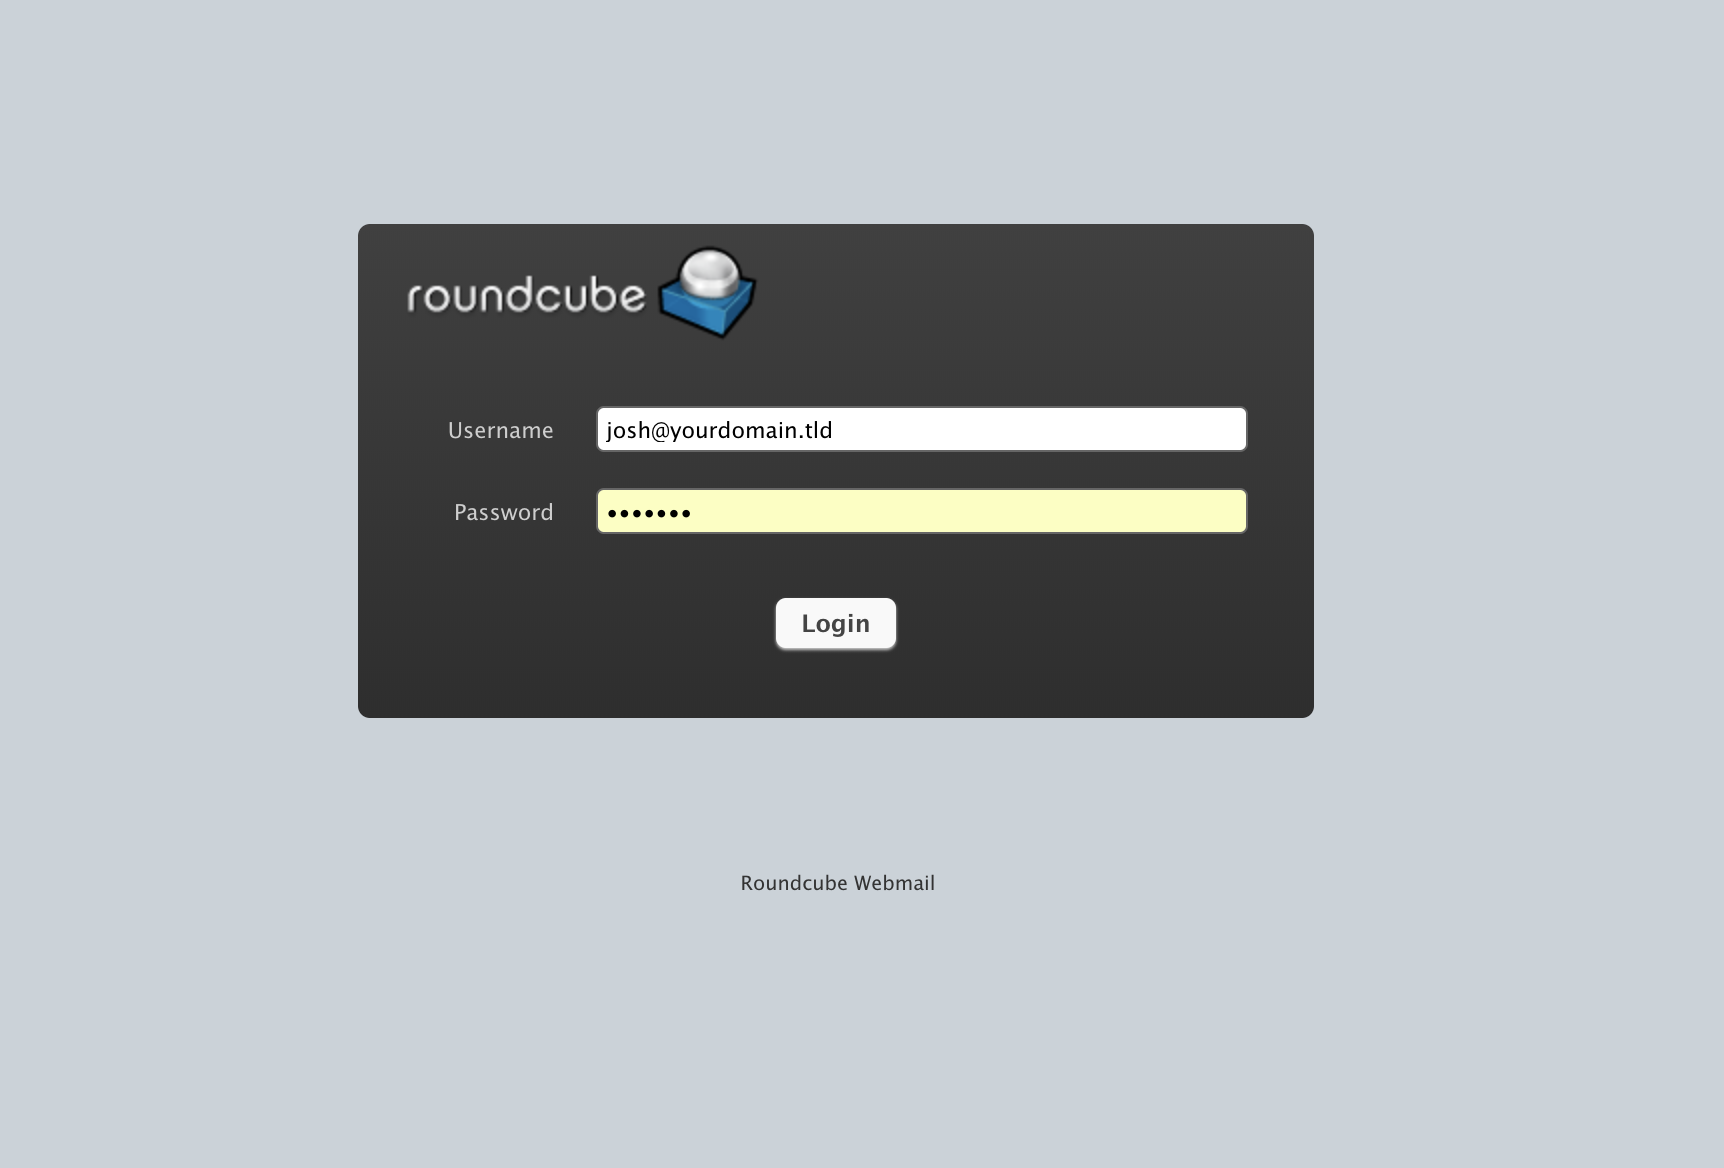
You can now install an open source email system like RoundCube from Virtualmin Tab > yourdomain.tld > Install Scripts. You can also configure your favourite desktop email client to send and receive emails.
Go to Virtualmin Tab > yourdomain.tld > Install Scripts > click on "Available Scripts" tab to see all available scripts. Free version includes few scripts. Upgrade to Pro version for 100's of scripts.
If you decide to install open source applications like phpMyAdmin for example, do not use default installation directory, as they are targets for exploits. Instead edit this field "Install sub-directory under public_html" and change installation to "somedir/phpmyadmin". This will install your applications inside a directory called "somedir". You can use this somedir to install all your open source scripts and then password protect somedir and everything inside it.
If the above instructions are followed, your website should be working and displaying the default page at http & https.
You can check your SSL security configurations at https://www.ssllabs.com/ssltest/. The AMI is configured to provide A+ score right out of the box.
By default TLSv1 & TLSv1.1 protocols are enabled. If your server need not support older devices like Windows XP, TLSv1 & TLSv1.1 can be removed from Nginx Config file.
	# replace this line
	ssl_protocols TLSv1 TLSv1.1 TLSv1.2;

	# with this line for each of your site
ssl_protocols TLSv1.2;Out of the box, your sites should be configured to support HTTP2 & ALPN. Visit https://tools.keycdn.com/http2-test to test if your site is configured properly.
If your IP has no email sending limitations and if SPF, DKIM, DMARC & hostname are setup as described above, then you should be able to test your email configuration by sending some emails from your server.
If you have installed an email script like RoundCube, send a test email to gmail and Microsoft based email like hotmail or outlook.com. Your IP might still be blocked based on spam lists that these email providers use to reject emails. If your emails are not delivered, check Postfix mail queue for messages that might contain the reason for not being able to deliver the email. From Webmin tab > Servers > Postfix Mail Server and click on "Mail Queue" button to see these messages.
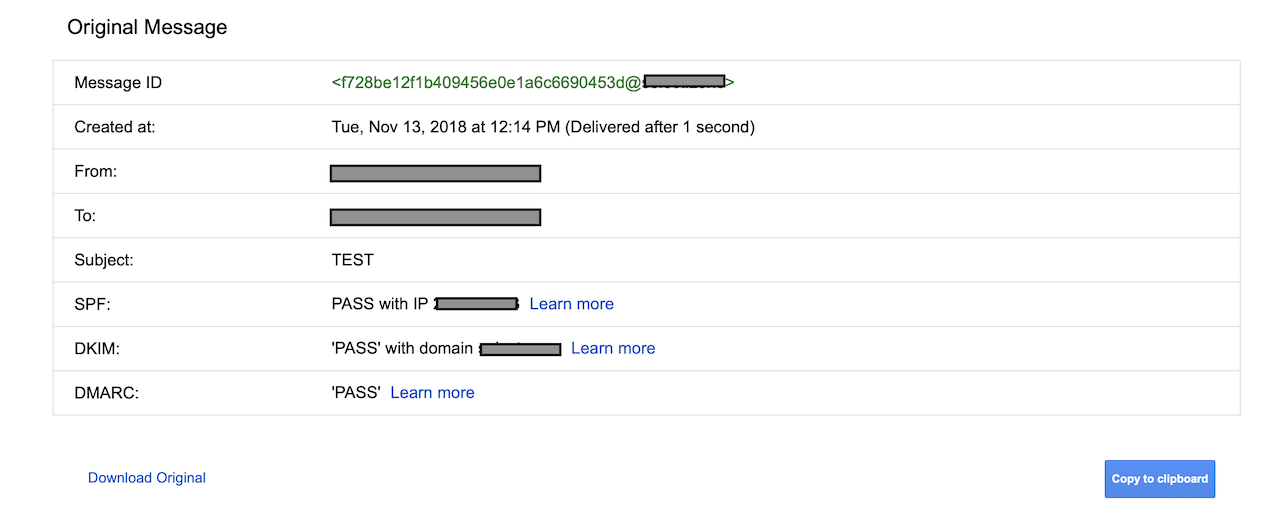
If your email was delivered successfully to inbox or spam, check email headers to see if SPF, DKIM & DMARC has a pass status. Use "View message source" or "Show original" options to view email headers.
To test SPF, DKIM & DMARC signing for emails originating from a server script, send an email using the mail command. Emails sent from server scripts / terminal should be successfully signed by host.yourdomain.tld
$ echo "Message Body Here" | mail -s "Subject Here" you@gmail.comConfigServer Security & Firewall's LFD Alerts can be tweaked from Webmin > System > ConfigServer Security & Firewall. Click on the wheel icon from top left to access ConfigServer's configuration. Update the following parameters to the desired levels, below settings are for example purposes only.
PT_USERPROC	= 50
PT_USERTIME	= 0
PT_LIMIT	= 600
PT_INTERVAL = 600By default, BIND DNS logs server activities for debug purposes. These files can become very large, laking up several GB's of hard disk space. You can disable this feature from Webmin > Servers > BIND DNS Server click on "Logging and Errors" icon, for "default_debug" option, select "Nowhere", instead of "File". After changing this, restart BIND DNS Server and also delete these log files using the commands below.
# restart BIND DNS Server
$ sudo systemctl restart named.service

# delete log files
$ sudo cd /var/named/data/
$ ls

# ls command will show all the log files such as named.run, delete them all using rm command
$ sudo rm named.run
			Disclaimer of Warranty:

	This AMI is provided on an "AS IS" BASIS,
 	WITHOUT WARRANTIES OR CONDITIONS OF ANY KIND, either express or
 	implied, including, without limitation, any warranties or conditions
 	of TITLE, NON-INFRINGEMENT, MERCHANTABILITY, or FITNESS FOR A
 	PARTICULAR PURPOSE. You are solely responsible for determining the
 	appropriateness of using the AMI and assume any risks.
 	Users are encouraged to do their due diligence to test all aspects
 	of this AMI for stability, performance and security. Every configuration
 	& server services might require further customization, tweaking and or
 	patching for production.


 			Limitation of Liability:

	In no event and under no legal theory,
 	whether in tort (including negligence), contract, or otherwise,
 	unless required by applicable law (such as deliberate and grossly
 	negligent acts) or agreed to in writing, shall any contributor be
 	liable to you for damages, including any direct, indirect, special,
 	incidental, or consequential damages of any character arising as a
 	result of this License or out of the use or inability to use the
 	Work (including but not limited to damages for loss of goodwill,
 	work stoppage, computer failure or malfunction, or any and all
 	other commercial damages or losses), even if such contributor
 	has been advised of the possibility of such damages.
